Followers

Pages

Tuesday, July 30, 2013

Charlotte Sweet Charlotte


Showcasing 'Charlotte' a digi-image from Milk Coffee. 
 Hello Everyone...

Today starts a new Challenge week at Twist of Faith. The main recipe needed is Children.   It's time to use your favorite stamp or digital image showcasing a child or children. And of course include a scripture, uplifting quote/sentiment, or positive verse in your creation.

 This week our Sponsor is Milk Coffee .  They are offering 5 Digi images to the winner of this challenge.
I chose to play with 'Charlotte' a Milk Coffee image and showcase her on a Swivel Card. When I sat to start bringing Charlotte to life in my world of color and paper I thought of when I made my First Communion as a child being brought up Catholic.  The ceremony was celebrated in church after lessons, teachings and prayers were learned. The girls would wear pretty white dresses with pretty white shoes...so this is how I pictured I was going to set up Charlotte's dress...in pretty white paper lace with pretty shoes to match as a sign of purity and giving her life to walking with God.

I placed a Scripture that swivels from the other side behind Charlotte. It's an amazing show-off kind of card. Here is where I got the Swivel Card directions by Sheila Weaver.  If I can do it you can. It is my first and not my last.
I want to share the method I used to get the dress this way. I cut a sheet of parchment paper 8 1/2 by 11 then put repositional glue(this was my first time trying but I will be using regular glue(from glider not liquid) on one side then glued it to a 8 1/2 by 11 white sheet of card stock. You will have to figure out how your printer will feed it. I had to turn my sheet upside down to accept the parchment side up as the printing side. Then picked the Cuttlebug embossing folder pattern I wanted to use. Cut a couple of the Charlotte printed sections and embossed the whole thing because I was going to cut what I wanted. In my case I cut the bird, dress and shoes. I did do a dark gray shadow on the image that is the main card design(original image) before placing the cut pieces(dress,shoes,bird). Apologies for not taking more pictures but hopefully this will get you started. Here is where I got my tutorial on this 3D paper piecing a stamped image. Mariska van de Veer is the teacher on this tutorial showcasing her awesome and beautiful work...check out her blog. Mine are not to be compared but as someone who loves details and making keepsakes.
Supplies Used:
Image - Charlotte by Milk Coffee
Faber Castell pencils, Liquid pearls,
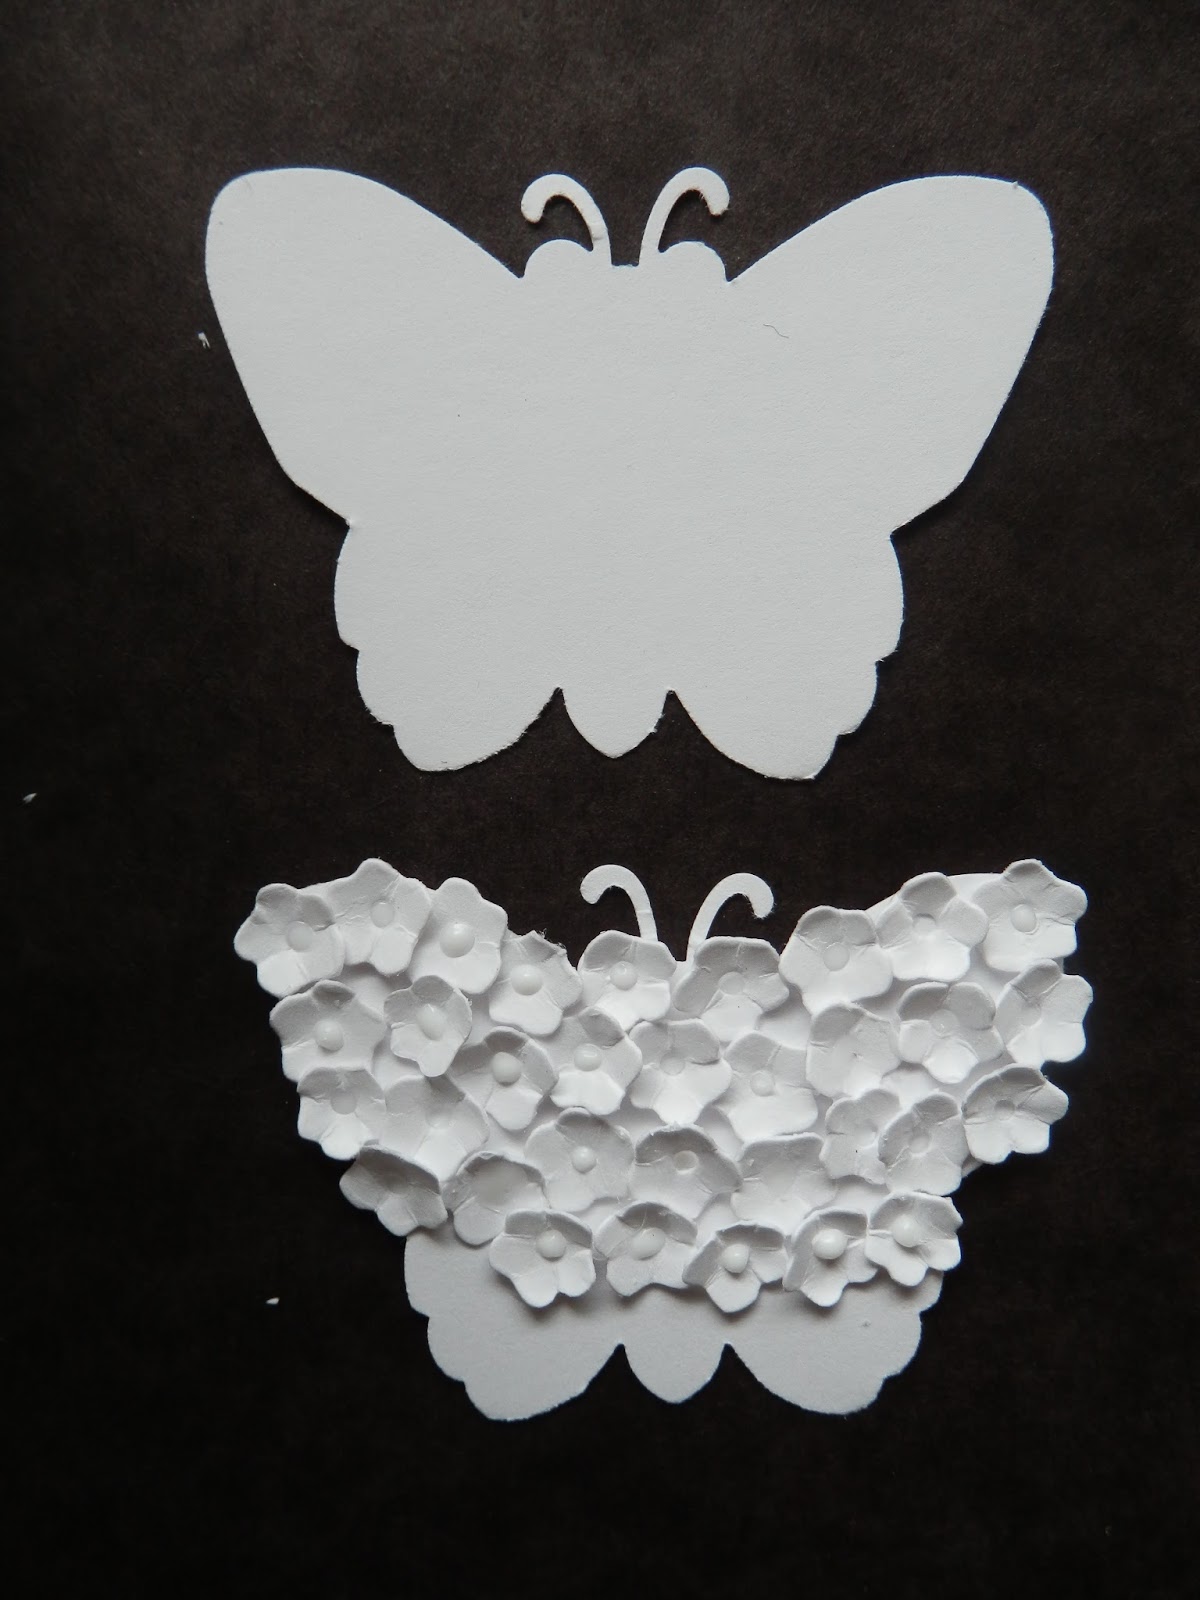
Martha Stewart glitter pens, Butterfly & Lace Border & Edge punch
 Cuttlebug embossing folder
Petalloo white flowers
Recollections: Bling
Inkadinkadoo- stamps(Jesus Loves You, Hope)
Spellbinder Shapebilities, Grand Nestabilities
Recollections- Black and Cream Swirl Design Paper
K & Company/Julianne & Watercolor Bouquet Design paper, puffy butterflies 
On the red-headed Charlotte I made my flowers using:
 
I loved the parchment paper process and look so much I wanted to make a regular card showcasing sweet Charlotte...well also I could not see parting with the first one...So this other one  is going to be for one of my Sisters. 
 
 
I hope you enjoy and give this a try and start following me around to see what fun we try next.

I want to submit both of these cards to:
Sentimental Sundays Challenge#165 Anything with Wings
Crafts for Eternity #134 - Anything Goes
 

Until next time this Shabby Chic Grannie is out....Bountiful Blessings of our Lord Jesus Christ to you and yours.
 
Don't forget to come by Twist of Faith this week and join in on the fun. I can't wait to see your creations.
 

Sunday, July 28, 2013

Christmas in July


Hello Everyone...

In case she looks familiar...yes its Coco making cocoa for Santa. I am thoroughly enjoying Coco and using her to bring Christmas Cheer early this year.

Coco is a  whimsical sweetie drawn by Artist Heather Valentin owner of Lacy Sunshine where you can find Coco their in different scenes and they are all adorable.

  Supplies Used:
Image - Coco/Lacy Sunshine
Martha Stewart Glitter Pens & Edge, Holly handpunch 
Faber Castell watercolor pencils
Recollections Cardstock , charm & Bling
Sizzix/Merry Christmas
Gesso/for marshmellows and steam


I am submitting this card to:
      Card Crafter's Circle  Challenge #85 - Christmas in July
      Clearly I Stamp Challenge #3 - Christmas in July
      Crafty Catz Challenge #193 - Christmas in July
      Jellypark Friends - Christmas in July

Before you leave I want to invite you to our weekly challenge at Twist of Faith where we invite you to share your uplifting, healing, inspirational and scriptural card creations.  Come on by and join the fun.
 
Until next time this Shabby Chic Grannie is out.  God Loves You...


Saturday, July 27, 2013

Fun Butterfly Tricks


Hello Everyone...

I wanted to share with you a couple of beautiful butterfly tricks.
Today I was wanting to put butterflies on a card project and I started with...I sure wish I had those Spellbinder Butterfly Shapebilities...I wish..I wish..I wish. Well that did not do any good so I had to get my mindset on what I have.  I pulled this beautiful Martha Stewart border punch from one of my craft drawers loving the intricacy of these butterflies.  This time when I looked at them I saw them as individual within the flock.
+++++
All the butterflies together made me think of how once we receive God in our hearts we grow in him and yearn to spend more time with him, his word and fellowship with others praising his name. We are all unique and intricately made united as we pray for our friends, families and nation.
++++
 It all came together for this card project. All the different sizes and beautiful shapes were all there I just needed to cut them out myself...how hard is that.  Once cut I ran them through my 1.5 inch Xyron machine, sprinkled glitter on them and pressed the glitter down. Here is a sneak peak at the card I am working on as one of the Design Team members at Twist of Faith. We have a new challenge coming up next Tuesday so be sure to come by and join in the fun.
For this other butterfly below I found it on Pinterest . The ladies design is gorgeous and you can check her out here for her details.  As usual we crafters always love getting ideas and tweaking them to our needs and imagination.  I used  different flower die method because it was what I have on hand. So I am sure you will too once you see and check your supplies. Here is a picture of  my process with the tools.
I used this die from Cuttlebug with the tiny flowers, McGill Embossing tool to give the flower shape once placed on the McGill Butterfly Punchout.
 
There are so many butterfly hand punches and dies I am sure you have one you can work with. Below is a closer look at how beautiful the flower details are giving the plain punch.
Once I finished the butterfly from my memory and then added and looked at the person who originally created  the style I did not follow correctly but hopefully you will . I love the final look of this one.  But hers is gorgeous and a must try.
The second embossed one is to make it a 3D look.
 
Hope you enjoyed and this gave you some money saving techniques on using what you have.
 
Until next time this Shabby Chic Grannie is out...Hugs and God's Bountiful Blessings to You.
Wait...
Here is an invitation to come by Twist of Faith Weekly Challenge Blog and join in the fun.
 

Tuesday, July 23, 2013

These Boots Were Made For...

Having fun crafting...heeeee
Hello Everyone,
 
I get happy excited each week I get to share with you the new weekly challenge over at Twist of Faith as one of their Design Team Members. Thank you for joining us last week on making a 'gatefold card' that was so much fun and my first time making one and I know it won't be the last.  Today starts the new challenge with the recipe of the card to consist :
BORDERS & FANCY EDGES
It's time to get out those punches, fancy scissors, dies, and/or cutting machines!
  There are so many different edges and borders that can be created
 - here is your chance to experiment!  And of course includes a scripture, uplifting quote/sentiment, or positive verse. 


Sponsor this week: 
Today I am going to share with you a couple of cards I enjoyed making using the image Western Boots by Digi Darla Designs.  Also be sure to go by and visit the Twist of Faith Challenge Blog for more inspiration from our other Design Team Members.  We can't wait to see what you create and share as you join in the fun.
I used Spellbinder Edgebilities, Nestabilities, Shapeabilities (Cattails & Rose Creations) along with a Martha Stewart corner punch, USArtquest watercolors and Faber Castell pencils. Archival and Momento inks for distressing.
 
I wanted to share with you how I got the boots on this first card to have this particular design. I printed the Western Boots digi image on patterned K & Company design paper, cut and paper pieced specific pieces, distressed with FaberCastell pencils and watercolored the spurs, sole and heel of the boots.
Here is my second card with the Western Boots. This card I colored with Faber Castell pencils. And yes, you do see added touches of actual blue jean I cut with Spellbinders flower  and hand cut a blue jean shadow behind the boots.
I love this short writing...it has true meaning in my Life Journey
 
I hope you are inspired to jump in the fun and join this weeks challenge at Twist of Faith don't forget to go by and check out the other Design teams cards for inspiration. 
I wanted to share...I am a Texas girl where Cowboys and Caballeros are home grown...so my love for boots are a close part of me.  Our boots are made for walking and showing off all the beautiful details boot makers now a days are designing. There are some beauties out there so designing my own was a blast. I hope you enjoyed my card and if you check out my previous post I share some tips, tricks and techniques I used to make some of these embellishments.
 
Until next time this Shabby Chic Grannie is out. Hugs and Bountiful Blessings of our Lord Jesus Christ who cares for YOU.
 

Saturday, July 20, 2013

Tips, Tricks and Techniques

.
Hello Everyone...

It's Saturday brunch time over here and I am a little under the weather...think its a sneaky bug making my body feel achy and sick.  The good thing is you can't catch it over the air waves of internet...and I can still play as I feel up to it.  Anyways...since I am bed bound...here is a sneak peak at a card I did using these few tips, tricks, techniques and  I am going to share with you now.  I will be sharing the whole card next Tuesday for the 'Twist of Faith' challenge, stay tuned for that.

I wanted to show you  another way we could use those Martha Stewart air dry clay molds. Well any air dry clay molds I just happen to have Martha Stewart.  I found as I would play mixing color on some they would not look the way I wanted and then when I wanted to use them they would not be the exact coloring I wanted so I painted them with white Gesso and then used regular ink pads of various colors to make the colors I wanted as you see below on the center of one of the flower.
I must say God is an incredible genius  blessing me with the idea. I have already used this technique on several of my cards.  I use a dobber if the mold is bigger and a small tipped watercolor brush if the mold is small and detailed like this center. It is amazing how that Gesso picks up the ink colors so gracefully giving great eye-candy to your project.
Below in this big White/pink flower clay mold previously it was a messy booboo when I tried creating a lighter pink center of the flower with a darker pink on edges. The process was I gave it  maybe 2 to 3 coats of Gesso let dry and I when I wanted to use it for this card. I lightly sanded some of the Gesso to give it a Shabby Chic look.

Here is a frame mold where I left with color I created by playing with clay and just adding a button in the center.
 
Next here is a tip I wanted to give you. When using delicate dies...Save the backing from your Xyron sticky machines and use as top layer before placing your actual paper you want cut so they don't tear and stick when you pull out...they come out just as beautiful and you have another piece to play with.  I am going to try alcohol inks with this extra strip.
This last technique I am sharing is with this spool of white tulle I bought at the dollar store. I apologize I did not take picture of process but you can change the color up on this to whatever you want instead of buying so many colors. I used my ink pad and dobbed the colors I wanted it to be. I am sure those distressed ink bottles are better for deeper colors. I am giving you the idea so you can run with it. I know I am thinking all kind of fun ways to use this tulle. We can use our Spellbinder/Sizzix flower dies to give our flowers extra texture. I used it as a background flourish on my card project below. You can't really tell from this picture but I gave the tulle some turquoise and brown touches.
 
I hope you enjoyed and have some new fun with your clay molds, recycled Xyron backing and tulle.
I am also sending you an invitation to stop by and join the weekly Challenge at Twist of Faith where we create and share cards with inspirational, healing and words of encourage through scripture.
 Until next time the Shabby Chic Grannie is out.  Blessings and hugs

Friday, July 19, 2013

Lights...Camera...Froggie Jayme is here

Hello Everyone...
 
Sharing with you today 'Beach Baby Jayme' created by Crissy Armstrong. I recently signed up at StampArt Designs by Kathyrne  and her Facebook page where this image was offered as a freebie through Whimsy Stamps a couple weeks ago. You can also go directly to Whimsy Stamps to get the Freebie Friday plus check out all their goods and Artist Creations.  Note: their Freebie Friday is only good until each Saturday. This week is a cutie 'I am Blue' a precious bird  by LiaStampz check it out  http://whimsystamps.com/
 
Well, I knew I wanted to play dress up with Beach Baby Jayme laugh out loud as I fell in love with her show-off cuteness. I am a glitzy girl even if I don't go out for the day I put on my jewelry just to go sit in the livingroom so I wanted to give Jayme my glitzy touch.  I just was not sure what colors to use so  I kept pulling out sheets of design paper to setup the backdrop for Jayme the Froggie.  And I wanted to give her some shadowing which I am not good at shadowing an image yet so I figure if I can't join them I will make my shadows work for me as I can... I hand cut Beach Baby Jayme out along with a couple of shadow colors.  Once I cut Jayme out I did use my McGill embossing tools to give dimension to Jayme's tummy, eyes, cheeks and umbrella and using pop dots to make them pooch out before attaching her to the shadows.
Miss Jayme is such a poser for the camera...heeee so I wanted to make sure her backdrop work just right for the camera and lights. Laugh out loud.  I finally found the right design papers and colors as my creativity was tickled by Kathryne  sharing a post on Penny's Paper-Crafty Challenge Blog who is having a challenge using black somewhere in your design.
Supplies Used:
Image: Beach Baby Jayme by Crissy Armstrong/Whimsy Stamps
Martha Stewart - Lace hand punch, glitter pens
Ranger Liquid pearls/pink
K & Company Design Paper
Recollections & Spare Parts - Flowers & bling
Sentiment/Scripture - JustRite Stamps
Faber Castell watercolor pencils
Spellbinders Nestabilities 
McGill Embossing Tools
 
Once I finish coloring Jayme the Froggie a scripture came to heart 'He has made everything beautiful in its time Ecclesiastes 3:11' which I had in a stamp by JustRite Stamps.
Sometimes its hard to feel beautiful on the outside...I found when I allow God to walk with me in my day and activities he gently whispers in the little things how much he loves me and I am his beautiful unique creation.  The flowers just seem prettier in color and stance as they bloom just for me . The little birds outside the window playing and chirping as they serenade me with a sweet song.
---------------
I am submitting this card to:
 Penny's Paper-Crafty Challenge #136 -Use black somewhere on your creation
And I want to leave you with an invitation to the weekly challenge at Twist of Faith...where I am blessed to be on the Design Team.  This week we are having a 'gatefold card' challenge...Come by join in the fun and show off your creativity.
Until next time this Shabby Chic Grannie is out.


Tuesday, July 16, 2013

I'm coocoo for Coco

Hello Everyone,

I am wanting to share with you a darling Lil' Christmas helper to Santa named Coco created by Heather the Founder of Lacy Sunshine Stamps.  This card I designed is all about showing off Coco as she makes Santa some hot chocolate with marshmallows.
Coco is only one of many precious whimsical images Heather has created. I hope you go by and check out the Lacy Sunshine Stamps on her Blog Store and join Lacy Sunshine in their Bi-weekly challenges. I am only a fan and crafter who loves using these images. I finally decided to throw my hat in the bucket and show off my card in their  current Challenge #12.
Here is the full front view of my card showing off that sweet lil' Coco. I am submitting this card to Lacy Sunshine Challenge #12  Anything goes must include hand colored image.

Supplies Used:
Image from Lacy Sunshine Stamps- Coco making Hot Chocolate
Faber Castell & Anna Griffin watercolor pencils
Martha Stewart - Glitter pens
Ranger - Pearl Drops
K & Company Design Paper
Recollections - Pink Bling & Red flowers
Spellbinders Nestabilities
Miscellaneous ribbons from Hobby Lobby
Charm/Believe
Sentiment/JustRite Stamps
Cuttlebug Embossing Folders/Smitten & Dots
Gesso(on the marshmellows & hot steam)
 
Inside Card
I hope you enjoyed my card...I am coocoo for Coco and all the whimsical Lacy Sunshine Gang. 
 
Until next time this Shabby Chic Grannie is out.
 Don't forget to come by and check out this weeks challenge at Twist of Faith. The challenge this week is making a gatefold card.